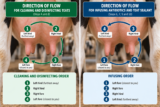
Optimum hygiene, confidence in technique and careful herd management are essential during the drying off process. Consistently following this 12-step protocol can support you in achieving your desired dry period outcomes of minimising new infections whilst curing existing infections.
Before you start, being prepared is key. A successful drying off starts long before the first tube is administered. A few simple preparations can make the job easier, safer and more efficient.
- Clip tails beforehand to help keep the working area clean.
- Mark cows clearly using different coloured sprays to identify cows receiving internal teat sealant only and those receiving both antibiotic and teat sealant.
- Work in the right order by starting with cows receiving teat sealant only, before moving on to those requiring antibiotics and sealant.
- Dry off in small manageable batches and have enough help available and make sure everyone knows their job.
- Keep tubes clean. Never leave tubes where they could become contaminated and do not use dirty tubes.
- Bring tubes to room temperature before use, in line with product instructions. However, do not warm them up by placing them in hot water!
- Don’t rush! Allow approximately 3.5–4 minutes per cow, or around 15 cows per hour.
Step 1: Put on Clean Gloves
Wash your hands and put on clean disposable gloves. Change or disinfect gloves between cows to avoid cross contamination.
Step 2: Dip All Four Teats
Cover all four teats with an approved teat disinfectant. Leave on the teats for at least 30 seconds to maximise bacterial kill.
Step 3: Dry the Teats
Dry all four teats thoroughly using clean, individual tissue paper for each cow.
Step 4: Thoroughly Disinfect Every Teat
Using cotton wool soaked in methylated spirits, clean each teat thoroughly, paying particular attention to the teat end. Use a fresh swab for each teat. Start with the teats furthest away and finish with those nearest to you.
Step 5: Assess Teat Hygiene
Inspect each swab after cleaning checking for any signs of contamination. If visibly dirty, disinfect the teat again using a fresh swab. Never insert a tube into a dirty teat.
Step 6: Infuse Antibiotic Tube (If Prescribed)
Using partial nozzle insertion, carefully infuse the antibiotic as directed. Start with the teats nearest to you and finish with those furthest away.
Step 7: Massage the Antibiotic Upwards
Gently massage the antibiotic upwards into the udder, following the manufacturer’s instructions.
Step 8: Disinfect Again
Before infusing an internal teat sealant, disinfect your gloves and clean all four teats again. Again, start with the teats furthest away. Never skip this step.
Step 9: Pinch the Base of the Teat
Firmly pinch the teat where it meets the udder. This ensures the internal teat sealant establishes an effective protective barrier within the teat canal and teat cistern. Start treatment with the teats nearest to you.
Step 10: Infuse the Teat Sealant
Keep the teat pinched and insert the sealant using partial nozzle insertion. Follow the product instructions. Do not massage the sealant upwards. It must stay in the teat to form a physical barrier against invading bacteria.
Step 11: Dip All Four Teats Again
Apply an approved teat disinfectant, making sure all four teats are fully covered.
Step 12: Keep Cows Standing
Move cows to a clean, dry area with fresh feed and water. Keep them standing for at least 30 minutes after treatment.
Monitor dry cows closely
Check cows regularly, especially during the first two weeks after drying off. Watch for swollen or painful quarters or signs of illness, and contact your vet if mastitis is suspected.
Remember: Good hygiene, correct tubing technique, appropriate antibiotic use and a clean environment are key to protecting udder health during the dry period.